Nov 22, 2011

Infrared on the cheap

When you make mobile robots, infrared detectors are a must. Here's a nice specimen taken in the Internet wilderness:


The problem is the cost. Starting at $13.95 US plus tax, plus shipping from Mars and the retarded Canadian border fees... in the end, it's to much. Not only that! It takes two weeks to come here. Two week! Are they using camels? I'm living in Quebec city, it's not that small, we even have asphalt and electricity.

Deep breath

Anyway for about $2.50 you can make the 'same' thing at home with these components:
  • Detector $1.95
  • Light $0.32
  • Resistor (220 ohms) ~$0.15
  • Bit of PCB board ~$0.01


Long live DIY

AMD's backyard

Blackberry is not the only company having a bad year, AMD is also having hiccups.


A tile just fell on AMD. It just canceled the production of the 28nm Bobcat processor. This news by itself is extremely bad for the company but this is not the only tile. In fact maybe the entire roof is caving in.

Around October AMD released is new Bulldozer chip. It was supposed to be their flag ship unlike the Bobcat which targets the mobile platform. A basic design decision in the Bulldozer chip makes it less effective.

During that time, on the server front, AMD is trying to push the use of its Fusion-Cloud (sadly based on the Bulldozer core). That effort is taking off like a concrete rocket while ARM based servers are in orbit. Yes, ARM, not in portable devices but in servers. They teamed up with Calxeda and mighty HP to start a new server technology.


While ARM is on the subject. AMD is not going anywhere on the mobile front either. Guess what's in your iPhone, Nexus, Galaxy or Blackberry? ARM of course.

C'mon AMD, get up and fight.

Trans-App / a bleep on the radar


A Facebook phone build on a mix of Android software & hardware optimize for Facebook-type features. Could this be the first real Trans-Application device? Like I mention in this original Trans-App post, the idea that devices would have to adapt to applications needs could become a reality.

To clarify the concept of Trans-Application I should say that Trans-App devices must be designed around constraints dictated by two or more applications. If this new Android-Facebook phone supports more than Facebook, it's well on its way to be a Trans-App device.

Why is this important? Because nobody will want to carry a Facebook phone and a LinkedIn phone and a Google Wallet phone. We want things to be integrated into one device. And while we're at it we want that device to fit in our pocket and have an 8 inch screen and.. um.. you know what I mean 'cause you want it too.

Purchase may soon be driven by the preference of devices optimizing the user experience of the favorite applications. Not by the OS. Not by the Browser. Not by the hardware brand.

Nov 13, 2011

Sunday night with Bluetooth

What do you do after installing your Christmas lights? Build a robot of course!


This projects started with a modified version of the Boe-Bot on which I added big dirt wheels scavenged from a dead RC car. The simple structure on top is made with my usual LEGO spider-legs system supporting the Arduino and its proto shield. I'm using the Sparfun proto shield since it has a build-in connector for the BlueSmirf Bluetooth breakout board and.. it's red. I also use two power supplies to separate the servos from the rest of the electronics.

Software wise, I used the Sena BTerm app to do some direct communication with the Bluetooth device. This app was very practical since it enabled me to only code on the Arduino side. This made prototyping very fast. The only real work began when I had to make the real Android app using Bluetooth. For that I hacked Google's BluetoothChat demo and after a short time I was using buttons and sliders to communicate with my Arduino. Why was that work? Eclipse...


A great advantage of using an Android device as the communication platform is the real-time outputs. This is very nice when debugging since you don't have to be tether with the laptop.

Edit 1: I later created an Arduino to Arduino link with bluetooth.

Edit 2: Here is similar code a later used for the minirccar

Nov 11, 2011

Nov 9, 2011

Trans-Application

In the last 10 years, with the rise of Apple devices and the mobile movement, applications must be cross-platform to survive. But lately, with Android or the Chrome browser, we see a new trend emerging where devices are created to be compatible with specific OS or applications. I call this Trans-Application.


I figured, we're already using the cross-platform, cross-device and cross-console when we refer to software compatibility, now we need a prefix for device compatibility.

Applications are gaining more and more power. Getting to FaceBook is more important than the way you get to it. Would you be surprised if there was a FaceBook tablet? It's not that crazy since 10 years ago people would have laughed at you if you had mention the possibility of a Chrome Book laptop.

Devices will soon have to conform to more than OS demands but probably to applications demands.


Trans-Application... or maybe Trans-App.

Nov 8, 2011

The deep end of the pool

When we think about Cloud computing two big players come into mind; Microsoft Azure and Amazon Web Services (AWS). A lot of people think that ‘Cloud is Cloud’ so both of them must be offering the same product, right? Well, one major difference between the two may change this point of view. Their philosophy of cloud development is radically different.


Before talking about those philosophies, another obvious difference must be mention. AWS is an Infrastructure as a Service (IaaS) while Azure is a Platform as a Service (PaaS).

Because a Cloud infrastructure is analog to a Grid infrastructure, processing can be distributed between multiple instances. So, for a process to really use the Cloud power it should be highly parallelized. Also, anybody that look into Cloud development long enough realizes that scalability and reliability can only be achieve through an abstraction layer (PaaS) that will manage self contained tasks and will be resistant to the failure of one or many instances. Finally, we also know that the state of availability in a Cloud will change over time. A Cloud process must adapt to that change and should proactively monitor availability instead of stopping when encountering availability issues.

This level of development architecture is not easily achieved. Developers who find that simple are most probably using other important principles like multi-threading and error recovery. This can all be done on a multi-core computer. When you add the complexity of distributed computing (grid computing), development architecture becomes even harder.

Now, back to philosophy.

When approaching Cloud Computing, the architect of a non-optimize system must decide to either, continue using their current philosophy or upgrade it by including parallelism, resilience to task failures and adaptation to changes in availability. This can be an overwhelming task and some architects choose the status quo.

The difference between Microsoft and Amazon is that Microsoft’s Azure is adhering to those optimization principles and therefore steer the users toward developing that way. On the other hand Amazon provide access to a bare bone IaaS the lets you run your processes no matter how non-optimize they are.

So, there you go. For non-optimized developers, developing with Azure is like learning to swim by jumping in the deep end without a flotation device.


I like the challenge!

Oct 29, 2011

When not coding...

I once worked in the video game business. Hopefully, with time a medication, I'll get over the nightmares :). Jokes aside, I was there as a software developer and I was secretly dreaming about introducing (in that studio) the use of sculpting during the character design phase. Finally, around 2009, the timing was right and during the design of a new game, I started working on the main character of a dinosaur game, a T-Rex!


My goal was to have the T-Rex stand in a dynamic pose without the tail touching the ground.


Sadly the game was cancelled during design. I never had time to go beyond the basic shape. My next step would have been to add the front legs and skin details. It was fun while it lasted.

Lego RC car


I've just stumbled on this picture from last year when I build a Lego RC car. It is motorized using the Lego Mindstorm 2.0 Brick and two motors. (one for steering and one for propulsion).


For the controller I simply used the Lego Mindstorm remote.


It only had one speed: darn slow. It didn't stopped the kid from playing with it for days.

Edit: you can also see my Mini RC car project here (Using Arduino, Bluetooth & Android)

Sep 19, 2011

Saving 40$

After having played with electronics for some time now, I start to see some nice benefits. So... Do you need a home-made-looking car charger to accessorize your 600$ smart phone? Well, today is your lucky day so fire up you soldering iron.

Ingredients:
  • An old cellphone charger with a proprietary connector that won't fit into anything standard.
  • A female USB connector (I took mine from a dead keyboard)
  • A multimeter
  • If you have a bad karma, you'll also need a 5v voltage regulator
  • 15 minutes of pure fun

Phase 1: Rip open that cellphone charger connector's head and get to the two wires that will give you a 5v current (you can check that with your handy multimeter).
  • If you're lucky: there will only be two wires giving exactly 5v.
  • If you're not lucky: You have more than two wire and have to find the right two using your multimeter.
  • If you're really not lucky: You have more than 5v and will have use that 5v current regulator.


Phase 2: Solder the two wires to the USB connector using this diagram...


...or this one.


Phase 3: Using hot glue and other methods you deem appropriate, hide your bad soldering job back into the connector's head.


Voila! 40$ saved. Now you can get McDo for your entire family and still have enough for a Starbucks tomorrow morning.

Sep 12, 2011

Leguino

WIP: testing the onboard LEDs
before soldering the PCB

Micro-controllers and electronics are taking over my spare time... did I say spare time? Robots and flashing lights being 'sooOOoo cool', my kids are always coming in to see the crazy things I'm working on and asking half a million questions while working at my side. There's nothing like the hands-on approach.

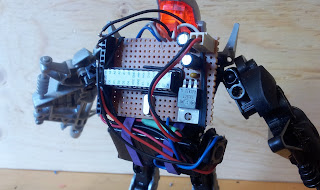
Some weeks ago, my 6 years old son came to me with his favorite Lego robot and started telling me is plan to put flashing lights in the chest and in the head. He proceeded to show me where the batteries would be and that the [Arduino] chip would be in the middle of robot's back with all the wires going to each parts. He finished by explaining that he wanted to use Mom's hot-glue gun to attach the parts.

The 'backpack': 9v battery (bottom),
5v regulation (right on PCB) and Arduino chip


Ah, the wave of geeky pride overwhelm my dad heart. He is one of us now!

Not only did he had a plan, it was a great plan. It was doable and all the necessary components were included.

Here's the result:

Jan 23, 2011

Feeling my way


During the Christmas vacation I built a mobile robot using the Boe-Bot structural base and adding the Arduino 'brain' on top. This permitted me to rapidly get to the collision avoidance systems. I wanted to build my own range sensors since I started using with Lego MindStorm RCX 2.0 in 2000. I was always impressed by those guys on the web who were building custom sensors and accessories for their MindStorm projects.

The plan was to build an infrared range sensor that would be contained in a 2x4 standard Lego brick. I started by gutting out the Lego brick and drilled two holes into it for the LED and the detector. When positioning the light, I made sure it was set further back than the IR detector to prevent the LED light to shine directly into the detector.


I used the same parts than the ones I used on the Boe-Bot but I modified the circuit to make it more compact. Then it was the origami process of fitting all the components inside the brick and welding everything (including two resistors).


Wire wise, both the light and the detector needed a ground (black), the detector needed a 5v feed (red) and both were connected to separate control pins on the Arduino (yellow for the LED and grey for the detector). I then glued a 2x4 Lego plate to close the sensor.

Here is the final product attached to a servo. In this configuration I was able to sweep left and right, covering a wider range with one sensor.

Jan 22, 2011

Arduino & Lego

I'm using Legos a lot to build quick prototypes (e.g. my robots). Now that I have an Arduino UNO, I had to find an easy way to mount the UNO board on any Lego constructions. I wanted this 'attachment' to be as light as possible. Here's what I did:


I did that by attaching Lego Technics parts to the UNO board with bolts and nuts.


This simple system enables me to configure the spacing between the Lego pins. This is done by sliding the back pins along the black bar and by rotating and/or sliding the front pins(with the grey bars).

Handmade Christmas

In September 2010 I took on a project that, as Christmas came closer, would prove itself bigger than I thought. At the time I was beginning to learn some basic stuff in electronics and I wanted to use those new skills to build something. But what? Then I remembered my wife's new found love for the whole Steam Punk genre and I decided to make her a steam punk 'something' for Christmas.

Initially, I was thinking of a simple device, with a couple of working buttons, connect to her computer using a USB cable. But my first design turned out to be impractical. The prototype was completely handmade using a Basic Stamp BS2 on-board chip to which I could add buttons and code to communicate with the computer.


It was working using an extra program, running on the computer, to listen to the communication port and, eventually, do something cool on the computer. That was not practical.

Taking a step back, I thought that sending some basic keyboard inputs would be plenty. For that, all I really needed was the guts of a working keyboard and hook that into a steam-punky looking shell. I sadly had to sacrificed a perfectly good keyboard, but it was done in a very humane way.

Then I found this very cool fire extinguisher from when-thing-where-build-to-last, made of brass.


For easy access, I cut the bottom off and I split the remaining cylinder lengthwise. That way, I could spread the metal enough that I could slide the bottom inside the main cylinder. The two part would be secured together by drilling holes trough both layers of metal and inserting screws. This system permitted me to take it apart if needed.

I then drilled all the holes for the switches, and broke two drill bits in the process.


The welding festival started by attaching all the keyboard connections to an PCB board. This would permit me to weld many wires to each of the keyboard original connections.


Wire cutting, wire striping, wire twisting, welding, welding, welding, testing and repeat 12 times. So it was, I welded all 12 switches to the board. There's a switch for the numbers 0 to 9 and one for the Shift key. The 12th switch was not used in the end.


During the drilling stage and the welding stage, I regretted having to do everything 12 times. This being my first electronic project, I grossly underestimated the multiplication effect of having so many components. But, Christmas was coming pretty fast and my wife, hearing all that noise, was probably anticipating the gift of all gifts. So, not counting the hours, I knew I had to finish this monster.

Final assembly began and I put everything together as fast as possible. I glued brass cupboard knobs (found at a flee market) on the switches using epoxy and I installed the pipes and gauges to get that steam punk look. In the last minutes I also added an electronic dice (those 7 little red lights) to make it more interactive. It went under the tree with only four days to spare before Christmas.

I present to you, The Steam Punk Keyboard-Extension/Electronic-Dice Device:


And here it is on here writing desk.