Showing posts with label livetankgame. Show all posts

May 2, 2013

Test design & LiveTankGame


Well, while I'm working on the design of the new LEGO test rig (see test1), I'm getting back into the tank project.  My generic goal for this long term project is to design a table top robotic game that will be a cross between a live card game and robotics.  So far I will have two tank platforms to test all the robotic modules so that I can prototype the gameplay based around those features.

TA1 (aka: whydontyouworkyou...)

You may ask yourself “Where the heck are you going with this?”, and that is a good question since I don't have a final answer yet.   You see, I like building stuff and I like cool-unusual-geeky-things that I can't afford so, many times, if I want something I have a tendency to build it.  My latest crazy idea came during the last Christmas vacation when my wife and I started playing a live card game called Android Netrunner.  No it has nothing to do with mobile phones.

The box

I found this game so cool that I had this crazy idea to reinvent the same level of gameplay using robots instead of cards. Why? Well... why not? Sooooo this is going to take a long time and I have to start by testing what kind of electronic interactions/capabilities the tanks can have. Once I have enough working features I will design the basic gameplay around them and build the two game tanks. Like I said... long term and so geeky that it technically falls into the nerd realm.

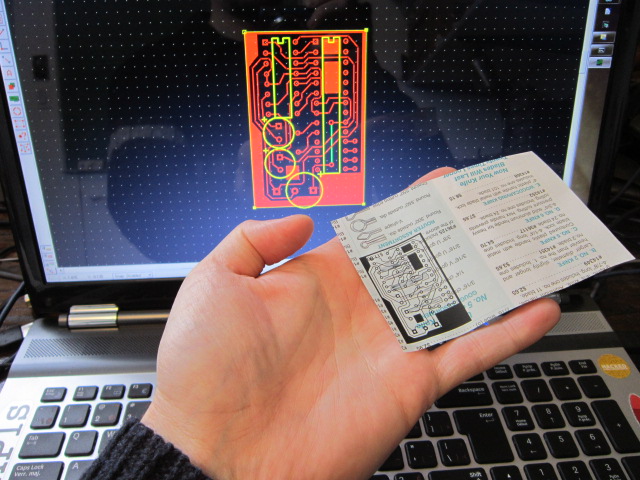
Here is a short update: The mobility base is composed of a robotic tank kit and a homemade DC motor driver. The motor driver PCB still needs a bit of redesign but it's functional for now and that... is good enough. Here I am building one of the two tank kits:


For now, the tank is controlled using an Android phone via bluetooth and I'm ready to start testing the other features like the laser, IR proximity sensors, light sensors, Ultrasonic range finder, etc...


Starting now, I will also tweet the updates using the hashtag #livetankgame.  


Jan 6, 2013

RoboTank #3 / motor driver version 2

Here is the second version of the programmable motor driver.


It uses a L239D chip to drive two DC motors and modulate their speed individually.   The board can be controlled with only two input wires.  This is made possible through an interface program loaded in the ATMEGA238 (same as Arduino UNO) onboard chip.  The interface chip and the driver chip are running on two separate power circuits and both are in sockets and can be easily replaced or, in the case of the ATMEGA238 chip, reprogrammed.

Using the ATMEGA238 chip makes this motor driver very versatile since 10 pins (5 digital and 5 analog) are still available for inputs/outputs.  This driver can then be reprogrammed and customized rapidly.  Here is the etching pattern I made using ExpressPCB:


Finally here's the part list:

  • 1x - Small copper clad laminate board
  • 1x - 16 pins socket
  • 1x - 28 pins socket
  • 2x - 0.1uf capacitor
  • 1x - 16MHz crystal
  • 2x - 6 pins female headers
  • 2x - PNP transistors
  • 2x - Inputs Screw Terminal 3.5mm (2 pins)
  • 2x - Inputs Screw Terminal 5mm (3 pins)
  • 1x - L293D (or SN754410)
  • 1x - ATMEGA238P-PU
  • Some wires
  • (optional) 1x - Heatsink for the L293D
I'll put up a Instructables ASAP with the PCB layout file.  Until then I can send it to you if you contact me directly.

Jan 4, 2013

RoboTank #2 / homemade PCB

This was my first attempt at making a PCB at home.  I follow this awesome tutorial explaining how to make PCB using a laser printer.  The first step was to design the board.  For this I used ExpressPCB free software.  Then I printed the design on a magazine paper.


The next step (which took me 3 tries) was to transfer the design to the copper plate using an iron.  This was a big learning experience about the necessary spacing between the traces and the amount of time to apply the iron.  In the end I got something that was good enough to go to the next step.


As suggested, I corrected the mistakes using a Sharpie pen.  After a Ferric Chloride bath here is the result:


I used a sponge to rub the surface during the etching.  Apparently the Sharpie fix is not meant to survive that kind of abuse.  This is still fixable.  The final step was to drill the through holes and do the assembly.


RoboTank #1 / The base

This is the first post about this new project using the TAMIYA Tracked Vehicle Kit as a base for building a robotic tank vehicle.  This will be an ongoing project and you should expect many posts about this subject.  Here's a video where I'm building one of the two kits I got:


Since the kit comes with  a single motor assembly allowing the tank to only go straight forward or backward,  I also bought the Double Gearbox from TAMIYA.  It can be assemble with 4 different ratios: 12.7:1, 38.2:1, 114.7:1 and 344.2:1.  I went for the 114.7:1 ratio since speed is not a necessity.


The tank kit is not build to fit with this particular gearbox so I had to modify the base plate to accommodate the support bar that came with the gearbox but that was meant for another kit.


I want to have an standard Arduino board running as the brain for this project.  Since there will probably be a lot components to control, I needed to drive the motors using only 2 pins from the Arduino board.  So, the next step was to build a motor driver PCB that would accept the inputs from the Arduino and take care of the rest.  This was a perfect excuse to make my first homemade PCB.  I'll get to that in the next post.