Dec 27, 2009

I could fix keyboards

I got my first computer when I was 20 years old (a late bloomer) back in 93. At the time, if a keyboard stopped working, I could fix it. It was no big deal, most of the people I knew could do it to. Troubleshooting the problem was easy.

Open the thingy and look inside.
If it's dirty: Clean it.
If a piece is loose: Push or bend it back in place.
If a piece is visibly broken: Make a new one or replace it with part from another dead thingy.
If a circuit was visibly burned: Replace it with the same part from another dead thingy or declare that one dead but keep it for the parts.

With this check list, you were able to go a long way before throwing something away. So I kept on fixing keyboards, mouses, laptops and PCs for years. Then one of my Natural-Keyboards broke. “No problem!” I was thinking, getting my tools out. It's been a long time and couldn't wait to see what it looked like inside. It was a shock. There's nothing in there. It was two pieces of clear plastic sheets, one of top of the other, covering the space under all the keys. Imbedded in the plastic is a bunch of circuits lines and by pressing the two plastic layers, lines on each layers would form a contact. It was not dirty, there was no pieces to get loose and it was not visibly broken or burned. I was screwed. 'So long' my 120.00$ keyboard and 'Hello' the cheapo 19.99$ keyboard. Yet another reminder of to the consuming world.

Nowadays if something breaks, most of the time we throw it away. If we bother to open the thing, it often brakes in the process since it's not meant to be opened. Once inside, we look at the one chip that, somehow, does everything in-there and sigh before throwing the pile of pieces in the garbage.

I like to fix things. Most of our tables, desks and cupboards in the house are nice old things having a second life. Not that long ago, my wife came home with an old sowing desk that we turned it into a side table in the living room. While fixing it I remove the sowing machine pedal that was still attached inside the desk.


It was begging me to open it and so I did.


It was simple swivel harm that could make contact at five different places on one long coil resistor, or be in the 'fully on' position or the 'fully off' position.
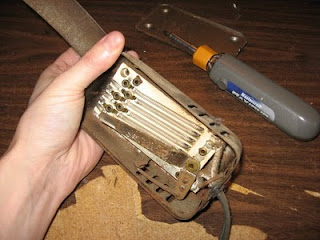

I had a mixture of emotions. I started by being impressed with the simplicity. I knew I could fix that and I knew I could use that design in an eventual project. I was also angry that things are not made like that anymore.

Dec 15, 2009

Points vs Hours

The pains of task estimation. It makes that warm feeling of starting a new project disappear completely. No matter what's your method, Waterfall or Agile, you have to tackle that features list at the beginning of the project and estimate like there's no tomorrow. It's always too big and all those estimations will enable the team to scope. And so, you get to it. It take all of your team days to get through it and a the same time you know you'll have to re-estimate all of those features throughout the entire project.

I got tired of that. Not fast enough, but after 16 years of estimating with hours I couldn't face another project like that. That's when I gave a good try to the Story Points system. It appeared a bit suspicious so I 'googled' away on the subject. My goal was to find THE reason that would convince any programmers on my team to switch to a points estimation. Lucky me, I found one and here it is:

Behold the one reason to use points over hours when estimating.
>> If you show two different features to two programmers, chances are they will not agree on how long, in time, it would take to code it. They will, on the other hand, always agree on which task is bigger than the other one. <<

It takes us now 2-4 hours to estimate what took us a full week before. Here are the easy steps:
1) Put all the possible stories in a spreadsheet.
2) Create a second spreadsheet that will contain, in the end, your estimated backlog (aka the list).
* In this list, the big stories will be at the top and the small ones at the bottom.
3) Copy the first story into the list. Since it's the first item, just drop it at the top of the sheet.
4) Copy the next story into the list by doing an insertion sort based on the simple question “Is this new story smaller or bigger?”.
5) Repeat step four for all the stories.
6) Giving points to the stories starting at the bottom of the list, by giving the first one 1 point.
7) Using the Poker Planning scale (0, ½, 1, 2, 3, 5, 8, 13, 20, 40, 100), ask yourself if the story above the last one is in the same scale.
* If it is: Give it the same estimate.
* If it's bigger: Give it the next increment in the scale.
* If it's smaller: Move it down until it fits.
8) Repeat step 7 for the entire list.

Tips:
- Try to make most of the list fit between the included values 1 and 13.
- Sometimes micro stories are at the bottom of the list. Give them the value ½.
- At the top you will probably find some Epics of values 20, 40 and even 100. those will have to be broken down into sub stories latter.

Those stories will never have to be re-estimated unless the descriptions changes dramatically. The velocity of the team can be calculated by the total of points they can burn in one sprint and that velocity normally stabilize after 2-3 sprints. With that value you can also predict how many sprints it will take to complete the backlog.

Go points!

Nov 18, 2009

Dimensions... again

In a previous post, I was wondering if it was possible to describe a dimension solely in terms understandable by the previous dimension(s) (i.e. describe (n)D in terms of (n-1)D). While thinking about this, I stumble on something interesting. But first lets start with some basic setup:

The Point
It all starts with the point. We say that the point is in 0D (no dimension).

The Line
To make a line starting from that point we can go in any directions around it. We than stretch that point into that direction and draw a line between the two points. We can then say that we had total freedom of movement to create that line. We would also be drawn to conclude that this freedom of movement was in a 3D volume. (Spherical coordinate system.)

The Square
Making the square is a similar process but this time we have stay perpendicular to the previous line. We then stretch the line anywhere around the original line and draw two extra lines liking the copied points. We had some freedom of movement to create that square and conclude that this freedom of movement was in a 2D plane. (Circular coordinate system)

The Cube
Repeating the procedure again will generate a cube. This time our movement have to stay perpendicular to the squares plane. We then stretch the square anywhere along a perpendicular line from the plane and draw four lines liking the copied points. Again, we had some freedom of movement to create that square. We would conclude that this freedom of movement was on a 1D line. (Linear coordinate system)


Looking back at what happen, we can see that as the dimensions are increasing from 0D to 3D the freedoms of movement decreases from 3D to 1D, leaving no dimension to continue stretching the cube into a possible next dimension. In a way, I was somewhat happy. It looked like a perfect circle, from 1D to 3D and back. I showed those results to my wife and the first thing she thought was “Of course you start describing the points freedom of movement as 3D because that's the max for you, they would not say that in line world”. She was right.

I ask myself: how would 1D and 2D describe the same transformation?

The Line
The line would say that the point as no dimension (0D). It would say that to make a line, you have to stretch the point into the first dimension. It then stretch the point anywhere along the existing Line World (1D) and draw a line between the two points. It can say that It had some freedom of movement to create that line. It would conclude that this freedom of movement was on a 1D line.

The Square
The square would also say that the point as no dimension (0D). It would also agree that to make a line, you have to stretch the point into 1D. It then stretch the point anywhere around the original point, while staying in the squares plane, and draw a line between the two points. It can say that It had some freedom of movement creating that line. It would conclude that this freedom of movement was in a 2D plane.
The square would then be able to go one step further than the 1D Line, by stretching the newly created line into it's 2D world with a freedom on a 1D line.


Since the maximum freedom of movement is bounded by our knowledge we cannot picture stretching beyond that limit. But, we as 3D beings, know that there is a second dimension even though the Line World can't see it.
A 4D being would say that the freedom of movement of the point, when creating the line, is in four dimensions. It would also be able to stretch the cube into the fourth dimension and understand why we can't see it.

Can that scale of dimensions be infinite?

Nov 11, 2009

Email Overflow

I'm one of those really bad people that can easily get a backed-up inbox, if I don't stay on top of my emails every minute of every day. I'm a get-up-and-say-it-to-the-person kind of guy.

Of course everybody that noticed my email reflux wanted to help me and they always happened to have the best method. So I tried all kinds of stuff: bucket by projects, by categories, by people, by fields of work,... It got much better and it was manageable but I still missed important emails here and there through the tsunami getting to my inbox.

Than came Bob (not the real name). Bob noticed. Bob wanted to help and Bob had the best method. He than told me about his two buckets method.

Two buckets? How does that even work?

The first bucket is for emails where my name is in the “To” field and the second bucket is for emails where my name is in the “CC” field. The justifying rules are: 1) If it's really important, people will put your name in the “To” field. 2) If your name is in the “CC” field, get to it when you can but keep your shirt on. 3) Anything else is getting to you through mailing lists and is not dire... in theory.

Wow! So far it's working great. Now I just have to check the “To” bucket all the time, check the “CC” bucket 5-6 times a day and check the main inbox in the morning and evening.

Ah, the small things in life.

Oct 27, 2009

Milliput

One day I needed to make very organic shapes on a scratch-build model. I put together all the basic parts knowing that I would have to fill all sharp corners and round-off all hard edges using the only putty I knew at the time, Tamya Putty.

Stop laughing

I won a prize for that model. First place in the SciFi Vehicle category. Of course, after I explained my methods to the other guys, I could have also won first place in the Idiot's Method category. That's when I learned about Super Sculpey, Milliput and other sculpting medium that everybody was using, except me of course.
If you didn't get the joke: Tamya Putty is to fill small cracks only. To use it the way I did, it's like trying to extend a wall using wall putty.
One of the modeler, whose work I admired, was working with Milliput. That was all I needed to select it as my future medium. Ha Milliput! I could finally make any shapes I wanted. I started making figures sculpted entirely by hand. Nothing could stop me now... except Milliput!


The thing is, it's a two parts epoxy paste that, out of the box, as the consistency of a dried bubble gum. Here are the steps for using it:

1: Make sure you have at least one hour to invest in this. Milliput takes time to mix and stays soft for only forty five minutes. After that, it's as malleable as depleted uranium.
2: Keep a small bowl of water and a rag near you on the table.
3: Guesstimate as best as you can the exact volume of Milliput you will need and add 20%. This stuff is expensive and once it's mixed you have to use it or it will be lost. My best advice is to always have a rough area to fill-in where you can put the small excess you will have. Don't under estimate because it sucks to remix a small batch.
4: Cut equal amounts of material A and B using a strong blade. (Remember, this is really hard stuff)
5: Try mixing the two parts into a perfectly even material by pressing, bashing, slicing & stacking and mushing the batch with your thumbs. It must be even or you will have holes in your surface. This takes about five minutes but it feels like thirty. At the end your thumbs normally feel as if you've cut your nails way to short and it's sensitive every time you push on their tips.
6: Start using it! You only have forty five minutes and it will get harder every minute. If the Milliput start sticking to your fingers, keep them wet by dipping them in the bowl of water next to you. When it gets to messy use the rag.
7: The next morning, once it's dry, you can use any kind of carving methods to continue shaping your surface.
8: To complete the sculpture, repeat those steps about fifty times.

This is not a joke. I used this stuff for years (from 1996 to 2007) and I had to do that every time. Needless to say that it was an adventure.

By the way, I'm now using Castilene for the last two years.