Showing posts with label lego. Show all posts

Mar 18, 2014

LEGO Test machine #2 is dead after 1 test

Well, that didn't last long.

The machine did 1 full test and then died at about 1/3 of the second test.  The first test result is 32,066 iterations, supporting the result from the Test Machine #1 which ended with 37,112 iterations. So the average is at 34,589 for the moment.

So, why is the machine #2 dead? It didn't died as much as it was slaying DC motors and it all came down to a bad design. One of my goal was to build the machine with only (as much as possible) the Makeblock parts that TLBRC* sent me.  It turns out that I found my nemesis in the motors that where included in the two kits. DC motors.

For something like this build, every molecules in my body was screaming stepper-motors or, at least, servos.  But NoooooOOOoooo, it had to be DC motors, so I looked around for ideas to use them in the same way I would use stepper-motors.   The result was to build physical barriers to stop the motor in known positions.  I knew this would not be good on the motor's gears so I monitored the current going into the DC motors and “tried” to stop them before they were straining. At this point in the story, all the engineers are rolling on the floor laughing. Well, 3 dead motors later, I've learned my lesson: Engineers are cruel and, most importantly, DC motors and made to run freely like wild mustangs in prairies.

The following video was made after the machine killed its first motor.  At that point I thought I could fix it:

Here is my sad video when I decided to stop the machine for good:

What now?  Thanks to Galaxy Quest, my motto is “Never give up, never surrender” and so I have 2 plans:

  1. Build a simple machine using stepper-motors.
  2. Find a DC motor friendly design and try that too.

But, in order to keep my sanity, I will take a short break from this and work on other projects.


R.I.P. LEGO Test Machine #2.  At least you did 1 full test.


*Again a big thanks to The Little British Robot Company for the 2 Makeblock kits that were used for building this project.  I will reuse those parts on a project pretty soon

Edit:
This story was covered on:


Dec 31, 2013

Profiling DC motors

For the second design of the LEGO test machine #2, I stopped using rotary encoders an switched to ACS712 lowcurrent sensors.


I initially hooked them to a multimeter and an Arduino to tweak the 2 potentiometers of the sensors. Following some of the steps from this MobileAPES post, I've set the voltage (Vref potentiometer) to 2.5v without any problems but the gain (GAIN potentiometer) was initially tricky. Back when I was using the rotary encoders, I was running the motors as slow as possible (speed of 65-85) in order to not stress the parts. At those speed the current fluctuations are too large and I had to find out what is the optimal low speed of the motors.
I decided to log the data out to better see what was going on. The initial test was to log the current sensor values every 1ms while raising the motor speed from 64 to 210 by increment of 5 every 20ms. 


Yellow=speed / Blue=running freely / Red=stalled (prevented from turning)

Clearly the values I get from the motor is erratic when the speed is below ~110. So I profiled the motor again from 130 to 230.


Yellow=speed / Blue=running freely / Red=stalled (prevented from turning)

Now I know the how slow the motors can go and how to detect a stall using the current sensor. This also told me how long the motor takes to ramp up to speed when initially set at a speed of 130.

Here's the diagram of the machine made with Fritzing:


I don't have the Adafruit motor shield [fritzing] part so I used the Arduino motor shield rev3 instead. The missing details are the following: The servo is connected on SER0 (pin 9), the push-down motor is connected on M2 and the lift-arm motor is connected to M3.

The code and the Fritzing diagram for this new version are available on git.

Oct 23, 2013

Once more into the [legotest] breach

Here's a video update about the progress of the LEGOtest machine #2 (#legotest)


Here is some extra info and progress starting with something I forgot to mention in the video: the shorter lever beam.


The lever was too long and, out of sheer luck, one of the shorter beams was the exact length needed. After that, I finally strengthened the base by removing the last LEGO legs and installing the Makeblock leg I showed in the video.


Once that was done it just made sense to attach the Arduino to the front leg as you can see in this picture of the whole machine:

The Makeblock parts are provided by The Little British Robot Company

As for the double action on the new motor; it both assembles the LEGO bricks and helps disassemble them.


The two movements are difficult to perform with a single motor since assembling needs a lot of strength while disassembling is all about subtlety. The part was first designed using LEGO Technics and it took 2-3 iterations before I found a way to achieve the two movements. To better understand the motion, check out the video.


Sep 15, 2013

Unboxing and Doodle cool

The parts for LEGO Test Machine #2 have made it safely across the Atlantic.


Makeblock parts from The Little British Robot Company

You can see me open the boxes and give some initial thoughts and ideas in this video:


When opening the shipping box, I've discovered a DoodleBot which the guys from TLBRC added as a gift. It's robot that can hold a pen and use it to either draw or write. I couldn’t resist so I built it right away and tested it by trying to make it write “Thanks TLBRC”. It 'kind of' looked good on the first try but clearly there is something wrong with one of the servos or sensor. I'm pretty sure that I didn't mount the rotation sensors properly so I'll have a look at it.

Seriously, look at this little thing. How can I stay made at it?

Still it's a really cool little robot base. The Arduino board that comes with the kit contains a ton of features and most are not used by the Doodle Bot. It even has a header to plug a Bluetooth device. Needless to say that I'll most likely reuse it for a future project.

If you ever get your hand on this kit, here are a couple of tips to make it work with the current Arduino IDE. By following the kit instructions you'll get to the right drivers and select the proper board. But to open and build the code in the IDE, you can do this:
  1. Open the Doodle_Bot_Text_Demo.pde with the Arduino IDE.
  2. Click OK when prompt about creating a ''Doodle_Bot_Test_Demo” folder.\
  3. (In a file explorer) Manually copy all the other demo files into this new folder
  4. (In Arduino IDE) Manually 'Add' all those files into the project
  5. In the Alphabet and Doodle_Bot_Text_Demo files, rename all the letters functions by adding the prefix 'l'. (e.g. F() becomes lF())

That's it, you should be ready to build and upload the code to the DoodleBot.

If you have any questions let me know.

Sep 6, 2013

Inside the box

So close I can almost touch it. Parts for the LEGO Test Machine #2 are coming and I feel like a kid before Christmas. Here's some pictures taken by the guys at The LittleBritish Robot Company while boxing all the goodies.


WhoooOOOoooo motors


Looking at the content I got inspired to create a new design focus around the use of the Makeblock wheels.


The top part (1) would go back and forth to assemble the brick by compressing them together. Disassembling the bricks would be done by a claw system (2) able to twist off the bottom brick. Finally the bottom plateau (3) would go up and down using an off-centred wheel, helping in the process of assembling or releasing the parts. It's just a rough idea but feel free to leave your thoughts and suggestions.

Now, how can I make time go faster? I could go to sleep until the package arrive. Naaaaaah I'll probably wait in front of the door like Scott Pilgrim.

Added:
You can see all the 'boxing' pictures on my G+ album

Aug 28, 2013

When in doubt... TLBRC

Oh yeah, this project is rolling again, thanks to The Little British Robot Company (TLBRC).

Like many modern relationships, we met on Twitter. They followed me, I followed them. I complimented their product, they answered (knowledge of social media is a good sign). Finally, I proposed a partnership and they said yes. WooooOOOOooooo!!!!!


[pause to reflect on how cool the Internet era is and how lucky I am to be part of it]

Anyway, I will redesign the second set of LEGO testing machines using almost only Makeblock parts (distributed by TLBRC) and TLBRC parts.

To get better results than the first LEGO Test Machine, certain features and constraints will be added to this new project:
  • Gather more than one control point (e.g. adding voltage, pressure, time, ...)
  • Use a rotation motion to remove the LEGO bricks.
  • Keep the test speed at 10 seconds per iteration to prevent heat from friction.
  • Perform many tests. Hopefully, many tests at the same time.
  • Test bricks from different eras.
  • Once the LEGO bricks have fallen the first time, rotate them 180 degrees to continue testing until they fail again.
  • Have a way to query the test status while it's running.
Also, instead of machining everything myself, I will be using the following:
  • Makeblock
  • TLBRC parts
  • LEGO parts
  • Arduino and other electronic components
  • TLBRC custom milled parts (If needed)


Let's get this show on the road...

May 27, 2013

LEGO Wear Test #2 - Design


I have the basic design  for the second LEGO wear test machine.  Here is a prototype made with Castilene plastic:


The result will be a long rig that will hold all 10 pairs of LEGO bricks to be tested simultaneously.  The parts will be made of machined metal fitting the brick shape as precisely as possible.  One thing that I learned from the first test is that it takes a lot of strength to hold those bricks, which is why I'm overkilling this one.


The bottom part is composed of two halves enabling the rig to either hold tight or release the piece completely.

Following comments that many viewers/readers have left, here are the new requirements:
  • Use a rotation motion to remove the LEGO bricks.
  • Keep the test speed at 10 seconds per iteration to prevent heat from friction.
  • Test 10 sets at the same time.
  • Test bricks from different eras.
  • Once the LEGO bricks have fallen the first time, rotate them 180 degrees to continue testing until it fails again.
  • Run the machine in the shed to keep the noise down.
  • Have a way to query the test status while it's running.
Not following comments that some viewers/readers have left:
  • This will not solve global warming
  • I will keep playing with LEGO bricks
  • My accent should not improve before the next test
One thing I'm leaving out is to have many control points and this test will [again] only count the iterations.  I initially wanted to monitor forces and current but it makes no sense with this simultaneous test. Next time...

For the test I've done my best to select bricks from 3 eras.  The new ones (3 pairs) were the easiest to find while the 2 pairs from the mid 70s posed a challenge.  It started with one pair I took from a set  bought at the flea market.  It was the set #370 from the mid 70s.  Looking at those two white bricks I noticed that they had a unique casting mark on one side.  After a lot of digging, I finally found two bricks with similar marks.  In a very non-scientific moment I declared that this unique feature probably means that they're from the same era.  Shoot me.


Now that the 10 pairs of bricks have been selected they are set aside until the test and other bricks are used during the rig's development.  Also, in a wave of madness, I might even run this new test twice with the side effect that I'm slowly destroying all the 2x3 bricks in the house.


Apr 19, 2013

LEGO all worn out

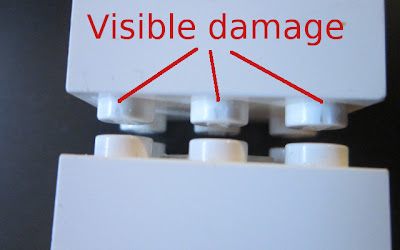
As suggested by Christopher Gaul, I took some macro(ish) pictures of the wear patterns on both the studs of the bottom LEGO brick and the inside walls and tubes of the top LEGO brick.

Clear marks are left on the sides of the studs (bottom LEGO)


The small ridges on the inside walls (top LEGO) are visibly worn down.  There is also damage to the tubes and even the walls themselves.


Here are the 2 pictures in full resolution (sorry for the low quality) without the notes:


CSI case #66531

Feb 28, 2013

LEGO's magic number is 37,112

Have you ever asked yourself this question: "How many times can I assemble LEGO bricks before they wear out?"

Well... probably never but I did (on LEGO SE).  The story would end there if didn't had the knack to build a machine to test it.  Here it is:


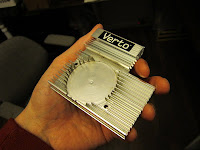
The first version was using a metal tube attaching the top servo to the LEGO brick.  It was too flimsy and died during initial testing.  So I took an old CPU heat sink...


And using my trusty angle cutter, I made this new arm:


A successful test proved that the LEGO was no match for this chunk of aluminium.  I then made an infra-red proximity sensor to detect if the presence of the LEGO and rigged the whole thing to an Arduino.  This was shot before the test started:


and this was shot about two thirds into the testing that lasted a whopping 10 days!!!


So here are the 2 dead LEGO bricks after 10 days and 37,112 assembling and disassembling.


Don't try this at home. It's long, noisy and cruel to LEGO bricks.

In the end, both pieces failed at 50%. The studs of the bottom brick and the inside walls of the top brick are visibly worn. Both bricks can still hold on (not strongly) to normal bricks but, when put together, they can't hold. In a way, you could say that they are still in working conditions as long as they don't meet again.

Here are some more answers:


This story was covered in the follow media:

Dec 23, 2012

LEGOtiny

After my last Mini RC Car project I knew I wanted to make a smaller better one.  Some months later and this is the result:


The reason why this one is in a LEGO body is because of this question on LEGO Stack Exchange where it was asked if it was possible to power the small LEGO City wheels.  At that point I had already started playing with micro DC motors and I also started using the ATtiny chip.  This was a perfect storm.  I had to build a super small LEGO vehicle.

Here are all the parts needed to make this build:


  • Set of gears from a race track car
  • LEGO wheels set
  • LEGO brick 2x2
  • Micro motor
  • 0.1uf capacitor
  • Transistor
  • Diode
  • ATtiny
  • Socket
  • Power adaptor
I'll go over the small details in an Instructables ASAP.  For now here's shot from the inside:


Here's a video where I show the final result:


Oct 16, 2012

His First Robot


We just finished this project so a created a page just for it.


This is a 5 hours project with my son Gérémy (7 years old at the time) who showed interest in doing some robotic using our old LEGO Mindstorm by building an RC car and wanted to build the RCX line following robot described in the Mindstorm books[...]


Aug 12, 2012

A new life for RCX 2.0


My LEGO Mindstorm had been unused for years now especially since I started using micro-controllers like BasicStamp and now Arduino. It had a short revival last winter when I used it to build a Star Wars R2-Unit crane for my twins. It was a real success and they played with it for two weeks straight.

Initially I was happy that my RCX was being used again but very puzzled that, after that playing stint, they had not included this new motorized brick into their regular LEGO play. Why? Maybe the cabling or specially the gears were a bit much for their age (7).

Lately my son made yet another awesome LEGO thingy and I told him he could make one part spin if he used the motors. He suddenly looked defeated and told me that “the pump thing is hard”. I finally knew why he was not using the RCX. He thought that the pneumatic system we used when making the crane, was the only way to make a working machine. Happy to enlighten him, I explained that he could use the motors alone and, at that very moment, I saw that his little brain was about to explode with ideas while he ran back to the LEGO boxes. His first creation was this 4 wheeled vehicle with one motor per wheel.


Then he dug up my old LEGO RCX 2.0 Mindstorm book that came with the kit, went through it one evening, found a line-following robot and built it the next day. I heard the perplexity in his voice when he called me saying “It's not working!”. The robot, going in circle, was missing the right code. I told him that building the physical robot was half the job and that it needed a program to tell him what to do. Of course now he wanted us to put the program in the robot.
I didn't want to disappoint him but the last time I pushed code on an RCX brick was in 2001 with a Windows XP computer. The software CD was probably lost in some storage box and, adding to the problem, loading a program must be done using a LEGO Infrared USB device (LEGO USB Tower) which are probably not supported anymore. Or so I thought.

I recovered my LEGO USB Tower and, ready for some major Internet archeology, Googled about LEGO RCX. I quickly found that Not Quite C (NQC) was still going strong. It was the programming language I used 10 years before. Not only that but I found that the LEGO USB Tower was now directly supported into Linux. So I plugged it in and BAM! /dev/usb/legousbtower0. Minutes later I uploaded a test program on the RCX brick and ran it. Victory is ours!


I coded a very simple program to show my son some basic logic in programing and now he's completely shocked by the fact that he can make a full robot, including the code.

I've created a monster and I like it.

More Geek info after the break

Nov 13, 2011

Sunday night with Bluetooth

What do you do after installing your Christmas lights? Build a robot of course!


This projects started with a modified version of the Boe-Bot on which I added big dirt wheels scavenged from a dead RC car. The simple structure on top is made with my usual LEGO spider-legs system supporting the Arduino and its proto shield. I'm using the Sparfun proto shield since it has a build-in connector for the BlueSmirf Bluetooth breakout board and.. it's red. I also use two power supplies to separate the servos from the rest of the electronics.

Software wise, I used the Sena BTerm app to do some direct communication with the Bluetooth device. This app was very practical since it enabled me to only code on the Arduino side. This made prototyping very fast. The only real work began when I had to make the real Android app using Bluetooth. For that I hacked Google's BluetoothChat demo and after a short time I was using buttons and sliders to communicate with my Arduino. Why was that work? Eclipse...


A great advantage of using an Android device as the communication platform is the real-time outputs. This is very nice when debugging since you don't have to be tether with the laptop.

Edit 1: I later created an Arduino to Arduino link with bluetooth.

Edit 2: Here is similar code a later used for the minirccar

Oct 29, 2011

Lego RC car


I've just stumbled on this picture from last year when I build a Lego RC car. It is motorized using the Lego Mindstorm 2.0 Brick and two motors. (one for steering and one for propulsion).


For the controller I simply used the Lego Mindstorm remote.


It only had one speed: darn slow. It didn't stopped the kid from playing with it for days.

Edit: you can also see my Mini RC car project here (Using Arduino, Bluetooth & Android)

Sep 12, 2011

Leguino

WIP: testing the onboard LEDs
before soldering the PCB

Micro-controllers and electronics are taking over my spare time... did I say spare time? Robots and flashing lights being 'sooOOoo cool', my kids are always coming in to see the crazy things I'm working on and asking half a million questions while working at my side. There's nothing like the hands-on approach.

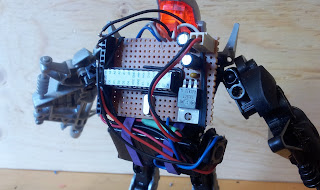
Some weeks ago, my 6 years old son came to me with his favorite Lego robot and started telling me is plan to put flashing lights in the chest and in the head. He proceeded to show me where the batteries would be and that the [Arduino] chip would be in the middle of robot's back with all the wires going to each parts. He finished by explaining that he wanted to use Mom's hot-glue gun to attach the parts.

The 'backpack': 9v battery (bottom),
5v regulation (right on PCB) and Arduino chip


Ah, the wave of geeky pride overwhelm my dad heart. He is one of us now!

Not only did he had a plan, it was a great plan. It was doable and all the necessary components were included.

Here's the result:

Jan 23, 2011

Feeling my way


During the Christmas vacation I built a mobile robot using the Boe-Bot structural base and adding the Arduino 'brain' on top. This permitted me to rapidly get to the collision avoidance systems. I wanted to build my own range sensors since I started using with Lego MindStorm RCX 2.0 in 2000. I was always impressed by those guys on the web who were building custom sensors and accessories for their MindStorm projects.

The plan was to build an infrared range sensor that would be contained in a 2x4 standard Lego brick. I started by gutting out the Lego brick and drilled two holes into it for the LED and the detector. When positioning the light, I made sure it was set further back than the IR detector to prevent the LED light to shine directly into the detector.


I used the same parts than the ones I used on the Boe-Bot but I modified the circuit to make it more compact. Then it was the origami process of fitting all the components inside the brick and welding everything (including two resistors).


Wire wise, both the light and the detector needed a ground (black), the detector needed a 5v feed (red) and both were connected to separate control pins on the Arduino (yellow for the LED and grey for the detector). I then glued a 2x4 Lego plate to close the sensor.

Here is the final product attached to a servo. In this configuration I was able to sweep left and right, covering a wider range with one sensor.

Jan 22, 2011

Arduino & Lego

I'm using Legos a lot to build quick prototypes (e.g. my robots). Now that I have an Arduino UNO, I had to find an easy way to mount the UNO board on any Lego constructions. I wanted this 'attachment' to be as light as possible. Here's what I did:


I did that by attaching Lego Technics parts to the UNO board with bolts and nuts.


This simple system enables me to configure the spacing between the Lego pins. This is done by sliding the back pins along the black bar and by rotating and/or sliding the front pins(with the grey bars).

Nov 2, 2010

Snow balling

I admit I'm still buying Legos and a vast majority of those are Lego Technics and Mindstorm that I use for prototypes and robots. But, from time to time like any 37 year old kid, I get a kit simply because it looks cool. Hence I have the Lego X-Wing.

This magnificent piece of design dating from the back-when-lucas-was-good era was siting on my work desk and my son, playing with it, said “Dad, can you make the ladder to climb in?”. Any reason to get my Legos out is a good reason, so Voila!


My son was happy but, like any good geek would, he had the obvious thought; what about the cane gizmo to get R2 in and out of the ship? The clouds parted and a ray of light beamed down on me. I was so ready for his demand... maybe I was too ready.
Not only did I built it but I made a working version using Lego Mindstorm motors and the remote control.


The rotation is powered with gears and the up-down motion is done with a pneumatic piston and a switch to select up or down (directing the air flow to the top or bottom of the piston). This extra manual step will come back to haunt me latter.
After watching my son playing with the crane for a bit, it was apparent that it's reach had to be improved. After all, I could still plug a third motor to the system. Some minutes latter version 2 was alive.


The base is resting on gliding 'skis' and stays in place because two of them are sitting in a groove. One side of the groove serves also as the row of teeth used by a gear (attached to the crane base) to pull or push the whole system. This gear is using a pulley system and so it just slips if the kids reach the end of the tracks (no grinding gears). The pneumatic switch had to be repositioned so that it would not jerk the whole assembly every time it's used (that switch is a real pain). Finally. the arm of the crane was also lengthened.
The kids (and I) played with that version for days. I added a weight in the back to prevent the 'gliding gear' to skip. This is the final version of this design:


In conclusion
The main problem with this crane is the pneumatic switch. All the other movements are made with the remote and the switch make the experience of using the crane awkward.

A second important point is to make it error proof. The pneumatic piston system and the pulley system permit the errors in the crane manipulation without breaking anything. On the other hand, the direct gears that are used to rotate the crane can skip, grind or break if something goes wrong. Also the tubing for the piston prevents the crane from doing a continuous rotation and could rip of. (We had a terrible accident where Han Solo was thrown across the flight deck...)

So the next project will be a new crane with a completely different design that can lift heavier loads and where all the controls are done using the remote. This system will also be error proof by using systems like:
* Pulleys
* Slip gears
* Automatic reverse

“Gentleman, we can rebuild it. We have the technology. [...]”